SAVE 15% . USE CODE: HOLIDAY15


How to Repair a Letterman Jacket: Rib Knit, Patches, and Zippers
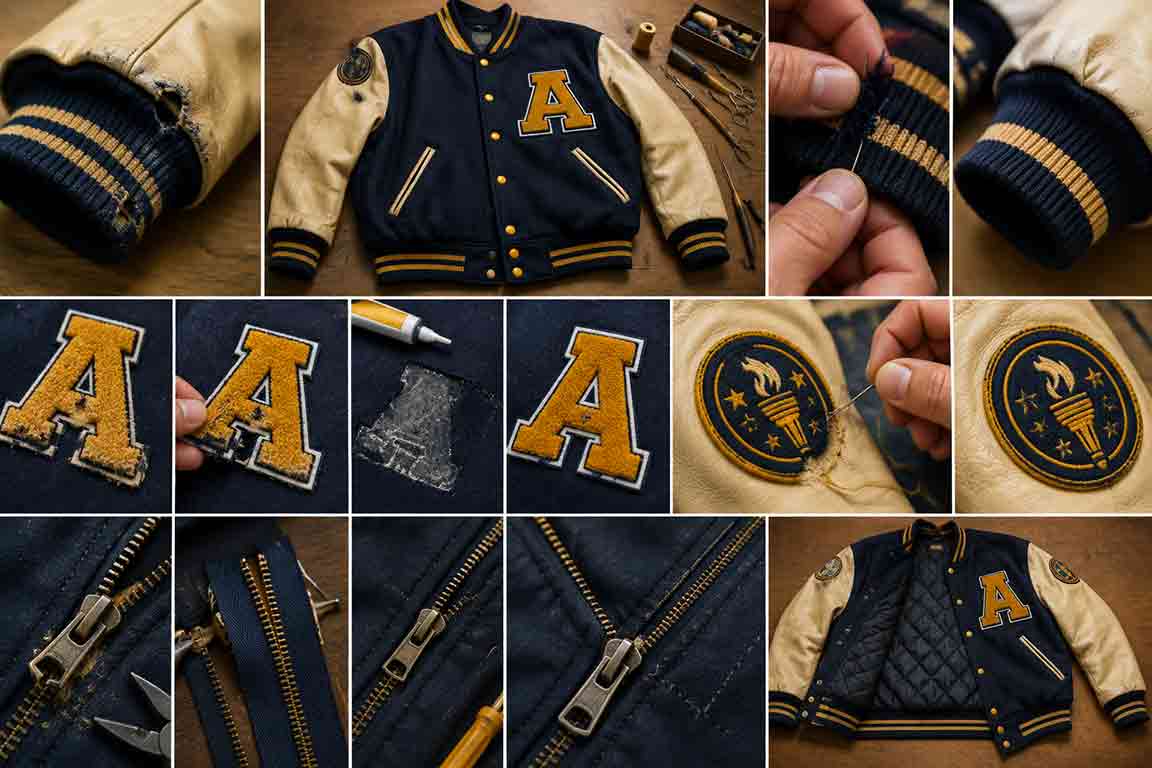
A letterman jacket isn’t just outerwear — it’s a record of earned achievements, school pride, and personal history. When the rib knit starts fraying at the cuffs, a cherished patch lifts at the corner, or the front zipper refuses to budge, the instinct to toss it is understandable. The better move? Fix it yourself. Most letterman jacket repairs are more approachable than they look, and doing them right preserves both the jacket’s structure and its sentimental value.
This guide walks through the three most common repair areas — rib knit trim (collar, cuffs, and waistband), patches (sew-on and iron-on), and zippers (stuck, broken slider, full replacement) — with step-by-step instructions, the right materials for each job, and clear signals for when to hand the work off to a professional.
What Makes Letterman Jackets Tricky to Repair
Before picking up a needle, it helps to understand what you’re working with. A classic letterman jacket combines two very different materials: a wool or wool-blend body and leather (or faux leather) sleeves. The rib knit trim connecting these pieces — at the collar, cuffs, and waistband — is typically a two-color acrylic or cotton-blend ribbing that takes a beating over time.
Each material has its own repair logic:
- Wool body: Responds well to hand-sewing, accepts patches, and can be spot-cleaned. Does not recover from moth damage.
- Leather sleeves: Requires leather needles, synthetic thread, and patience. Every hole is permanent.
- Rib knit trim: The most commonly damaged area, and also the most straightforward to replace with the right ribbing fabric.
- Embroidered patches: Generally durable, but the edges can lift with wear. Re-stitching is simple with the right approach.
Knowing which zone of the jacket you’re working on determines which tools you’ll need and how careful you have to be.
Tools and Materials to Have on Hand
You don’t need a professional sewing kit to handle most letterman jacket repairs. A basic setup covers the majority of issues:
For rib knit repair:
- Seam ripper
- Matching rib knit ribbing (available at fabric stores like Joann’s or online; look for tubular rib knit with at least two-way stretch)
- Sewing machine with a zigzag or stretch stitch setting (or a serger if available)
- Pins or binder clips
- Iron and pressing cloth
For patch repair:
- Matching thread (polyester or nylon — not cotton, which breaks under stress)
- Hand-sewing needle (curved needle for thicker sections)
- Fabric glue as a temporary positioning aid
- Iron (for iron-on patches)
For zipper repair:
- Needle-nose pliers
- Flush cutters or wire cutters
- Replacement slider (sized to match your existing zipper — YKK sizes are the most common)
- Zipper lubricant, bar soap, beeswax, or a graphite pencil
- Sewing machine (only needed for full zipper replacement)
Part 1: Repairing the Rib Knit Trim
The rib knit at the collar, cuffs, and waistband is the most frequently worn-out part of a letterman jacket. Constant friction, stretching, and washing slowly degrade the elasticity and fabric integrity until you’re left with fraying edges, holes, or a waistband that no longer pulls snug.
The good news: replacing rib knit is one of the more beginner-friendly garment repairs. You’re not working with leather or complex seam structures — just removing a tube of ribbing and sewing on a new one.
Assessing the Damage
Before cutting anything, determine whether you need a patch repair or a full replacement:
- Fraying edge or small hole near the seam line: A patch or simple hand-stitch repair may be enough.
- Lost elasticity across the full band: Full replacement is the right call. You can’t restore elastic stretch once it’s gone.
- Unraveling or separating ribbing: Full replacement.
Step-by-Step: Replacing Rib Knit Cuffs
Step 1: Source your replacement ribbing. Look for rib knit fabric that matches the original’s color, weight, and stretch direction. Tubular rib knit (already formed into a tube) is the easiest to work with for cuffs. Standard cuff width is roughly 3–4 inches. Two-color stripe ribbing to match the original school colors can be found at specialty suppliers like Seattle Fabrics or through online retailers.
Step 2: Remove the old cuff. Use a seam ripper to carefully open the seam where the cuff meets the sleeve. Work slowly and avoid cutting into the sleeve fabric itself. Once detached, remove all loose threads and press the sleeve opening flat with an iron.
Step 3: Measure and cut new cuffs. Measure the circumference of the sleeve opening. Cut your new ribbing so the unstretched circumference is roughly 75–80% of the sleeve opening — this creates the tension that keeps the cuff snug. For width, double your desired finished cuff width (typically 3–4 inches) since you’ll fold it in half. For example, for a 3-inch finished cuff on a 10-inch sleeve opening, cut a piece approximately 8 inches wide and 8 inches long (10 × 0.80 = 8).
Step 4: Sew the cuff into a tube. Fold the ribbing piece with right sides together along the short edge. Sew a seam to create a tube. Press the seam open, then fold the tube in half lengthwise so the seam is on the inside.
Step 5: Attach the new cuff. Slide the folded cuff over the sleeve end with raw edges aligned. Distribute the fabric evenly, pin in place, and sew using a zigzag or stretch stitch — a straight stitch will pop when the fabric stretches. Stretch the cuff slightly as you sew to match the sleeve circumference.
Step 6: Finish the seam. Serge or zigzag the raw seam allowance to prevent fraying. Press the seam upward toward the sleeve interior.
Replacing the Collar and Waistband
The process for the collar and waistband follows the same logic. The main difference is scale:
- The waistband is wider and wraps a larger circumference, so measure carefully before cutting.
- The collar may involve a facing on the inside of the jacket — you’ll need to re-attach this after sewing the new collar piece in place.
- For jackets with a combined wool-and-rib waistband (a strip of wool flanking the ribbing section), note how much of the waistband is wool versus rib knit before removing the old one, and replicate that ratio in the replacement.
When to Call a Professional
If the leather sleeves have begun separating at the seam where they meet the rib knit cuffs, the repair involves sewing through leather — which means permanent needle holes. A mistake is visible and irreversible. In that case, take the jacket to a tailor or leather repair specialist. Shops that specialize in varsity and letterman jacket restoration (such as LeatherCare USA) can replace rib knit trim on wool and leather jackets using industrial equipment that handles the transition between materials cleanly.
Part 2: Repairing Patches
Letterman jacket patches — chenille letters, embroidered emblems, sport bars, and chevrons — are built to last. But over years of wear, the edges can lift, stitching can loosen, and iron-on adhesive can fail. Repairing them before they fully detach is much easier than resewing an entirely loose patch.
Fixing a Lifting or Partially Detached Patch
For sew-on patches with loose edges:
Thread a hand-sewing needle with polyester or nylon thread in a color that matches either the patch border or the jacket fabric (whichever will be less visible). Use a whipstitch along the lifted edge, pulling the thread through both the patch and the jacket fabric in a consistent motion. For thick chenille patches, a curved needle gives you better control and reduces hand strain.
Start your stitching a centimeter or so before where the lifting begins — anchoring into intact stitching — and end the same way on the other side. This prevents the repair from pulling away from its starting point under stress.
For iron-on patches that have lifted:
If only an edge has lifted, a fabric glue or patch adhesive applied under the corner can re-bond the patch. Lay the jacket on a flat surface, apply a small amount of fabric glue under the lifted section, press firmly, and allow it to dry completely before wearing. For more durable results, follow with a line of hand stitching around the perimeter.
If the entire patch has come free, you’ll need to re-apply it. For iron-on patches, lay the patch in position on the jacket, cover with a pressing cloth (never apply the iron directly to a chenille or embroidered patch), and press with a hot iron for 30–40 seconds using firm, even pressure. Allow it to cool before moving the jacket. Iron-on adhesive alone is rarely sufficient for heavy use — follow up with hand stitching around the perimeter for a lasting hold.
Sewing a New Patch onto a Letterman Jacket
Whether you’re adding a new achievement patch or replacing a lost one, the approach is the same:
Step 1: Position the patch. Place the patch where you want it and use fabric pins or a small amount of fabric glue to hold it temporarily. Step back and check the placement before committing — once sewn, repositioning means unpicking every stitch.
Step 2: Thread and knot your needle. Use a double strand of polyester thread for extra durability. Match the thread color to the patch border.
Step 3: Sew around the perimeter. Start from inside the jacket and push the needle up through the fabric and the patch’s edge. Use a whipstitch or running stitch to work your way around the entire patch. Keep stitches even and spaced about ¼ inch apart. For large patches, you can also use a sewing machine if you have access and the patch isn’t in a position the machine can’t reach.
Step 4: Secure and finish. Tie off the thread on the inside of the jacket with a secure knot. Trim any excess thread.
Iron-On vs. Sew-On: Which Holds Better?
On a letterman jacket — especially one with a wool body — hand-sewn patches consistently outperform iron-on adhesive alone. Wool doesn’t bond as reliably to iron-on adhesive as flat cotton does, and the thicker material means the heat doesn’t always penetrate fully. For patches you want to stay put for years, sew them on. Use the iron-on method only as a first step to lock the patch in place before stitching.
Part 3: Repairing the Zipper
Letterman jacket zippers take constant daily use. The most common problems are: a stuck or jammed zipper, a slider that won’t close the teeth (leaving the zipper open even when “zipped”), a broken pull tab, and — in more severe cases — a zipper that needs full replacement.
Fixing a Stuck or Jammed Zipper
Before assuming the zipper is broken, check for the most common culprit: something caught in the teeth.
Turn the jacket inside out and inspect the zipper track. If you can see a thread, a bit of lining fabric, or debris caught between the teeth, remove it with tweezers. Then lubricate the zipper: run a graphite pencil, a bar of soap, a beeswax candle, or lip balm along both sides of the teeth. Work the slider up and down gently — avoid forcing it, which can strip the teeth or damage the slider housing. In most cases, lubrication alone resolves a stuck zipper.
Fixing a Zipper That Won’t Close
If the zipper slides freely but the teeth separate behind the slider instead of locking together, the slider has worn out and lost the tension needed to mesh the teeth. This is one of the most common zipper failures on well-worn jackets, and it’s fixable without replacing the entire zipper.
Option 1: Squeeze the slider. Using needle-nose pliers, very gently squeeze the top and bottom plates of the slider closer together. This tightens the channel through which the teeth pass, restoring the grip. Do this incrementally — over-squeezing will jam the slider completely. Test the zipper after each small adjustment.
Option 2: Replace the slider. If squeezing doesn’t work or the slider is cracked, replacing it is more reliable. Sliders are sold by zipper size and type (coil vs. metal teeth, standard vs. separating). Check your existing zipper for size markings, or bring the jacket to a fabric store to match it in person.
To replace the slider: unzip the jacket fully, use flush cutters or pliers to carefully remove only the top stop on the side of the zipper that has the slider. Work the old slider off the top of the track. Thread the new slider onto the track at an angle to navigate the fabric edge, then zip it up and down a few times to confirm it works. Reinstall or create a new top stop — a small drop of melted plastic from a lighter works on plastic zippers; a crimped metal stop or a few tight hand stitches work on metal zippers.
Replacing a Broken Pull Tab
A missing or broken pull tab is a simple fix. Thread a small keyring, a short loop of paracord, or a commercially available zipper pull replacement through the hole in the slider. For a cleaner result, purchase a proper zipper pull from a fabric or outdoor gear store and attach it through the slider’s attachment point.
Full Zipper Replacement
A full zipper replacement is needed when the teeth are damaged, the zipper tape has separated from the jacket fabric, or the bottom box piece (the component that joins the two halves) is broken. This is the most involved repair on this list and generally requires a sewing machine.
The key principle: you don’t have to unravel the jacket’s internal seams to replace a zipper. The method used by repair professionals involves sewing fabric facings (narrow strips of fabric) over the new zipper tape and sewing them to the jacket’s front opening from the outside, covering the old attachment points.
If you’re comfortable at a sewing machine, this is achievable at home. If not, it’s a strong candidate for a professional tailor. A zipper replacement on a standard jacket typically runs $25–$60 at a local alterations shop.
When to DIY vs. When to Go to a Professional
Most of the repairs covered above are well within the range of a beginner sewer with some patience and the right materials. But some situations call for professional hands:
Take it to a pro when:
- The leather sleeves have a large tear or the seam joining leather to rib knit has separated — leather needle holes are permanent.
- The wool body has moth damage or significant structural holes.
- The zipper needs full replacement and you’re not comfortable at a sewing machine.
- The jacket has significant sentimental or monetary value and you don’t want to risk it.
- Multiple repairs are needed at once — a restoration specialist can handle everything in a single job.
Shops that specialize in letterman and varsity jacket restoration — not general dry cleaners — have the industrial equipment and experience to handle the wool-leather-rib knit combination correctly. General dry cleaning is not sufficient for these jackets and can cause damage.
Preventive Maintenance: Making Repairs Last
Once you’ve put the work in, a few habits keep the jacket in better shape going forward:
- Store it properly. Hang the jacket on a padded hanger (not a wire one) in a breathable garment bag. Never compress it in a storage bin, which degrades the wool and stresses the rib knit seams.
- Lubricate the zipper twice a year. A quick pass with beeswax or zipper lubricant prevents the slider from wearing prematurely.
- Re-stitch patch edges at the first sign of lifting. A two-minute repair now prevents a 20-minute repair later.
- Spot-clean the wool body with a damp cloth and mild detergent rather than machine washing. Machine washing can shrink, felt, or distort the wool.
- Condition leather sleeves once a year with a leather conditioner appropriate for the finish. Dry leather cracks, and cracked leather is much harder to repair than supple leather.
Summary: Quick Repair Reference
| Problem | DIY Difficulty | What You Need |
|---|---|---|
| Stuck zipper | Easy | Lubricant (beeswax, soap, graphite) |
| Zipper won’t close | Easy–Medium | Needle-nose pliers or replacement slider |
| Broken pull tab | Easy | Zipper pull or keyring |
| Full zipper replacement | Medium–Hard | Sewing machine, new zipper, facings |
| Patch edge lifting (sew-on) | Easy | Thread, needle, whipstitch |
| Full patch re-application | Easy–Medium | Thread, iron, fabric glue |
| Rib knit cuff replacement | Medium | New ribbing, sewing machine, stretch stitch |
| Collar/waistband replacement | Medium | New ribbing, sewing machine, measurements |
| Leather seam tear | Hard | Professional tailor recommended |
A letterman jacket that’s been repaired well is still a letterman jacket. The repairs don’t diminish what the jacket represents — and in many cases, the care you put into maintaining it says something too. Start with the simplest fix first, work carefully, and don’t hesitate to call in a professional when the materials or complexity exceed your comfort level.
Before attempting any repair on a jacket with significant sentimental or monetary value, consider consulting a professional tailor or restoration specialist for an estimate. Many offer assessments at no cost.
Frequently Asked Questions
Can I machine wash a letterman jacket after repairing it?
No. Letterman jackets with wool bodies and leather sleeves should never go in a washing machine. Machine washing can shrink and felt the wool, crack the leather, and loosen freshly sewn patches or rib knit seams. Spot-clean the wool body with a damp cloth and mild detergent, and take the jacket to a leather specialist for a deeper clean when needed.
How do I find matching rib knit ribbing for my jacket’s colors?
Start at specialty fabric retailers that carry varsity jacket supplies — Seattle Fabrics and The Rain Shed both stock rib knit ribbing in multiple colors. If you can’t find an exact match in store, bring a swatch to a fabric shop and ask staff to help you color-match. For two-color stripe ribbing specific to school colors, some online embroidery and letterman jacket suppliers sell pre-made ribbing sets.
My zipper slider keeps splitting open after I zip it — is the whole zipper ruined?
Not necessarily. A slider that fails to hold the teeth together has usually just loosened over time. Try gently squeezing the top and bottom plates of the slider with needle-nose pliers to tighten the channel. If that doesn’t fix it, replacing only the slider — not the entire zipper — is a quick, inexpensive repair that costs a few dollars and takes about 15 minutes.
Is it safe to use a regular iron directly on embroidered letterman patches?
Never place a hot iron directly on chenille or embroidered patches — the heat can melt fibers, flatten the raised texture, and cause permanent damage. Always use a pressing cloth (a thin cotton cloth or even a clean dish towel) between the iron and the patch. Press firmly and hold for 30–40 seconds rather than moving the iron back and forth.
How much does it cost to have a letterman jacket professionally repaired?
Costs vary by repair type. A zipper slider replacement or minor patch re-stitching at a local tailor typically runs $15–$40. Full zipper replacement is usually $25–$60. Rib knit cuff or waistband replacement at a specialist shop runs roughly $50–$100 depending on how many pieces need replacing. Full restoration services — cleaning, color refinishing, and multiple repairs — can range from $100 to $200 or more, but for a jacket with real sentimental value, that investment is often well worth it.